 Cooking
Rustic No-Knead Rosemary Garlic Sourdough Bread
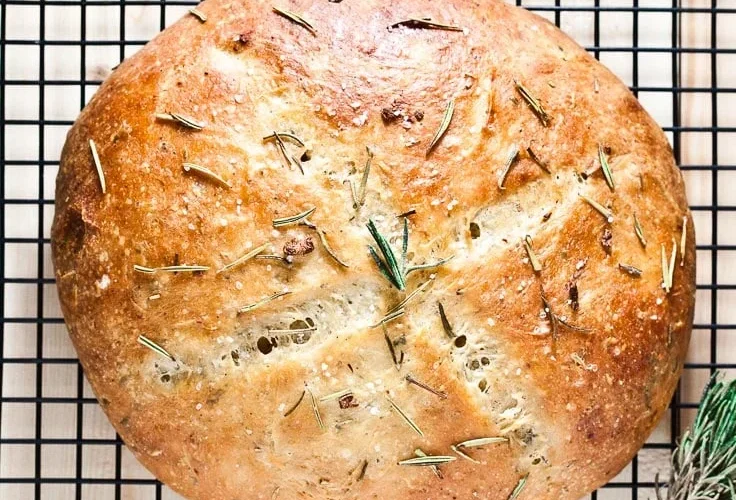
Rustic No-Knead Rosemary Garlic Sourdough Bread is a delicious homemade loaf with a crisp, golden-brown crust, a soft and chewy interior, and wonderful savory flavor from fresh rosemary and garlic. It is an excellent recipe for anyone who loves artisan-style sourdough bread but does not want to spend a long time kneading dough by hand. Instead of traditional kneading, this recipe relies on resting, gentle stretch-and-folds, and a long fermentation to naturally develop the dough.
The combination of sourdough starter, fresh rosemary, and garlic creates a loaf that is incredibly aromatic while baking. As the bread rises in the oven, the rosemary releases its herbal fragrance and the garlic becomes warm and savory. The result is a rustic loaf that looks impressive but is surprisingly simple to prepare.
Why You’ll Love This Rosemary Garlic Sourdough Bread
One of the best things about this recipe is its simplicity. You only need a handful of basic ingredients, and most of the preparation time is hands-off. There is no complicated kneading process and no need for a stand mixer. The sourdough starter does most of the work during the long fermentation period.
The finished bread has a beautiful crust with a tender, slightly chewy crumb. Fresh rosemary adds a fragrant herbal flavor, while minced garlic gives the bread a savory depth that makes every slice delicious. It is especially good when served warm with butter, alongside soup, or toasted with olive oil.
Recipe Overview
Prep Time: 20 minutes
Rest/Fermentation: 10–16 hours
Bake Time: 45–50 minutes
Total Time: About 12–17 hours
Yield: 1 large loaf
Difficulty: Easy
Ingredients
- 100 g active sourdough starter
- 350 g warm water
- 500 g bread flour
- 10 g fine sea salt
- 2 tablespoons fresh rosemary, finely chopped
- 4–5 garlic cloves, finely minced
- 1 tablespoon olive oil
- 1 teaspoon honey or maple syrup, optional
- Extra flour, for shaping
- A little olive oil or parchment paper for baking
Use an Active Sourdough Starter
For the best results, use a sourdough starter that is active, bubbly, and recently fed. A strong starter is important because it provides the natural fermentation needed to make the dough rise. If your starter is sluggish or has not been fed recently, the fermentation process may take considerably longer.
Ideally, your starter should show plenty of bubbles and have a pleasant mildly sour aroma. The exact timing will depend on the temperature of your kitchen and the strength of your starter.
Step 1: Mix the Dough
Begin by adding the active sourdough starter and warm water to a large mixing bowl. Stir well until the starter is mostly dissolved into the water. This helps distribute the starter evenly throughout the dough.
Add the bread flour, fine sea salt, finely chopped rosemary, minced garlic, olive oil, and optional honey or maple syrup. Mix everything together using a wooden spoon or your hands until the flour is fully hydrated and a rough, sticky dough forms.
Do not worry if the dough looks messy at this stage. There is no need to knead it until smooth. The dough will gradually become stronger and more elastic through resting, fermentation, and gentle stretch-and-folds.
Step 2: Rest the Dough
Cover the mixing bowl with a clean kitchen towel or plastic wrap and allow the dough to rest at room temperature for approximately 30 minutes.
This resting period gives the flour time to absorb the water and allows the dough to begin developing structure naturally. The dough may still feel sticky and loose, which is completely normal.
Avoid adding excessive flour at this stage because doing so can make the finished bread heavier and denser.
Step 3: Perform Gentle Stretch-and-Folds
After the first 30-minute rest, wet your hands lightly to prevent the dough from sticking. Grab one side of the dough, gently stretch it upward, and fold it over the center.
Turn the bowl and repeat the process three or four times until you have worked around the entire dough. Cover the bowl and let the dough rest for another 30 minutes.
Repeat the stretch-and-fold process two or three more times, approximately every 30 minutes. With each round, you should notice the dough becoming smoother, stronger, and more elastic.
The purpose of stretch-and-folds is to build strength without traditional kneading. Be gentle and avoid aggressively pressing or tearing the dough.
Step 4: Bulk Fermentation
After completing the stretch-and-folds, cover the bowl again and allow the dough to ferment at room temperature.
Bulk fermentation can take approximately 4–8 hours, depending on the temperature of your kitchen and the activity of your sourdough starter. Rather than relying only on the clock, pay attention to the appearance and feel of the dough.
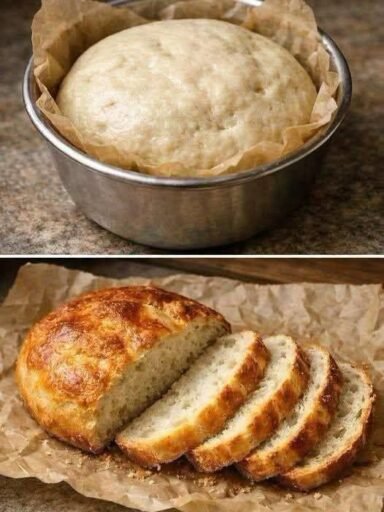
The dough should become noticeably puffy and increase in size by approximately 50–75%. You may see bubbles developing around the sides of the bowl, and the dough should feel airy and slightly jiggly when the bowl is gently moved.
A warmer kitchen will generally speed up fermentation, while a cooler kitchen can make the process take longer.
Step 5: Shape the Loaf
Once the dough has completed bulk fermentation, lightly flour your work surface and gently turn the dough out onto it.
Shape the dough into a round boule by folding the outer edges toward the center. Once the dough has been gathered, gently pull it toward yourself across the work surface to create surface tension.
Try not to press all the air out of the dough. Those fermentation bubbles contribute to the open, chewy texture of the finished sourdough.
Place the shaped dough seam-side up into a well-floured banneton. If you do not have a banneton, you can use a bowl lined with a clean kitchen towel that has been generously dusted with flour.
Step 6: Cold Proof
Cover the shaped dough and place it in the refrigerator for 8–12 hours, preferably overnight.
Cold proofing is one of the easiest ways to develop excellent sourdough flavor. The slower fermentation allows the flavors to become deeper and more complex while also helping the dough develop a pleasant texture.
The chilled dough is also easier to score before baking, so keeping it cold until you are ready to bake can make the final steps much easier.
Step 7: Preheat the Oven and Dutch Oven
Place a Dutch oven with its lid inside your oven. Preheat the oven to 450°F (230°C) for at least 30–45 minutes.
Do not rush this step. A thoroughly heated Dutch oven is essential for getting good oven spring and a beautifully crisp crust.
The covered Dutch oven traps steam released from the dough during the beginning of baking. This helps the loaf expand before the crust becomes firm.
Step 8: Score the Bread
When you are ready to bake, carefully turn the cold dough onto a piece of parchment paper.
Dust the surface lightly with flour if desired. Using a sharp bread lame or razor blade, make one deep slash across the top of the loaf.
You can also make a few smaller decorative cuts if you want a more artistic rustic appearance. Scoring gives the expanding dough a controlled place to open during baking instead of cracking randomly.
Step 9: Bake the Sourdough
Carefully lower the parchment and dough into the preheated Dutch oven.
Cover with the lid and bake for 25 minutes at 450°F (230°C).
After 25 minutes, carefully remove the lid and reduce the oven temperature to 425°F (220°C). Continue baking for another 18–25 minutes, or until the loaf is deeply golden brown.
For an especially dark and crispy crust, you can bake it for a few additional minutes. Keep a close eye on the loaf toward the end because ovens vary in temperature.
The finished bread should have a firm, beautifully browned crust and should sound hollow when gently tapped.
Step 10: Cool Completely
Once baked, carefully transfer the bread to a wire rack.
Allow the loaf to cool for at least one hour before slicing. Although it can be very tempting to cut into freshly baked sourdough immediately, cooling gives the interior time to finish setting.
Slicing too early can cause the crumb to become gummy or compressed. Patience during this final step makes a noticeable difference in the texture of the bread.
Tips for the Best Rosemary Garlic Sourdough
Use an Active Starter
A bubbly, active sourdough starter is one of the most important ingredients in this recipe. Make sure your starter is strong enough to rise well after feeding before beginning the dough.
Keep the Garlic Balanced
Fresh garlic provides plenty of flavor, so there is no need to add a large amount. Stick close to the recommended 4–5 cloves. Too much fresh garlic can add extra moisture and may affect the fermentation process.
Use Fresh Rosemary
Fresh rosemary gives the bread a bright, aromatic herbal flavor. Finely chop it before adding it to the dough so that the flavor is distributed evenly throughout the loaf.
Try Roasted Garlic
For a sweeter and milder garlic flavor, roast the garlic until soft and golden. Allow it to cool completely before gently squeezing the roasted garlic into the dough.
Roasted garlic creates a softer, slightly sweet flavor that pairs beautifully with sourdough and rosemary.
Watch the Dough Instead of the Clock
Fermentation times can vary considerably. Temperature, starter strength, flour, and hydration can all affect how quickly the dough develops.
Instead of relying entirely on the stated hours, look for a dough that has become puffy, airy, and noticeably larger.
Do Not Skip the Dutch Oven Preheat
A properly preheated Dutch oven helps create the steam and heat needed for excellent oven spring. It also contributes to the crisp, golden crust that makes homemade sourdough so appealing.
How to Serve Rosemary Garlic Sourdough Bread
This rustic sourdough loaf is incredibly versatile. Slice it thick and serve it with salted butter for a simple snack, or dip it into olive oil and balsamic vinegar for an easy appetizer.
It also pairs beautifully with hearty soups and stews. The chewy crumb is perfect for soaking up flavorful broth without falling apart immediately.
For breakfast, toast slices and serve them alongside scrambled or fried eggs. You can also use the bread as a base for grilled chicken sandwiches, vegetable sandwiches, or simple cheese toast.
For an easy appetizer, arrange toasted slices with cheese, olives, roasted vegetables, and other favorite toppings.
The rosemary and garlic become especially fragrant when the bread is toasted, making leftover slices just as enjoyable as the freshly baked loaf.
Storage Instructions
Once the bread has cooled completely, keep it at room temperature in a paper bag or loosely wrapped in a clean kitchen towel.
It is best enjoyed within 2–3 days. Avoid storing the loaf in a tightly sealed plastic bag at room temperature because the trapped moisture can soften the crust.
For longer storage, slice the bread and place the slices in an airtight freezer bag. The bread can be frozen for up to 3 months.
When you want a slice, toast it directly from frozen for a quick and convenient homemade bread option.
Frequently Asked Questions
Can I make this bread without a Dutch oven?
A Dutch oven gives the best results because it traps steam around the dough during the first part of baking. If you do not have one, you can use another oven-safe heavy baking vessel with a lid, provided it can safely withstand the high temperature.
Can I use dried rosemary?
Fresh rosemary provides the best texture and aroma, but dried rosemary can be used if necessary. Since dried herbs are more concentrated, use a smaller amount and adjust according to taste.
Why is my sourdough taking longer to rise?
The most common reasons are a cool kitchen or a weak starter. Sourdough fermentation depends heavily on temperature and starter activity. Give the dough more time if it has not become noticeably puffy.
Can I add more garlic?
You can adjust the garlic slightly according to your preference, but it is best not to add a large amount of fresh garlic because it can introduce additional moisture into the dough and affect fermentation.
Why should I cool the bread before slicing?
Cooling allows the crumb to finish setting. Cutting into the loaf while it is still very hot can result in a gummy or compressed interior.
Final Thoughts
Rustic No-Knead Rosemary Garlic Sourdough Bread is a wonderful recipe for anyone who wants the flavor and appearance of artisan bread without the effort of traditional kneading. The long fermentation gives the loaf a naturally tangy sourdough character, while fresh rosemary and garlic add an irresistible savory aroma.
Although the recipe takes several hours from start to finish, most of that time is hands-off. You simply mix the dough, give it a few gentle stretch-and-folds, allow it to ferment, shape it, refrigerate it overnight, and bake it the next day.
The finished loaf has a crisp golden crust, a soft chewy crumb, and plenty of rosemary-garlic flavor. Serve it with butter, soup, eggs, roasted vegetables, cheese, or your favorite meal. Once you become comfortable with the fermentation process, this rustic sourdough loaf can easily become a regular part of your homemade bread routine.
Recipe Card
Rustic No-Knead Rosemary Garlic Sourdough Bread
Description: A rustic homemade sourdough loaf with a crisp golden crust, soft chewy crumb, fresh rosemary, and savory garlic flavor. No traditional kneading is required.
Prep Time: 20 minutes
Rest/Fermentation: 10–16 hours
Bake Time: 45–50 minutes
Total Time: About 12–17 hours
Yield: 1 large loaf
Difficulty: Easy
Ingredients
- 100 g active sourdough starter
- 350 g warm water
- 500 g bread flour
- 10 g fine sea salt
- 2 tablespoons fresh rosemary, finely chopped
- 4–5 garlic cloves, finely minced
- 1 tablespoon olive oil
- 1 teaspoon honey or maple syrup, optional
- Extra flour, for shaping
- A little olive oil or parchment paper for baking
Instructions
- Mix sourdough starter and warm water in a large bowl until mostly dissolved.
- Add bread flour, salt, rosemary, garlic, olive oil, and optional honey or maple syrup.
- Mix until a rough, sticky dough forms. Do not knead.
- Cover and rest for 30 minutes.
- Perform gentle stretch-and-folds, then rest for another 30 minutes. Repeat 2–3 more times.
- Cover and bulk ferment at room temperature for approximately 4–8 hours, or until the dough is puffy and has increased by about 50–75%.
- Shape the dough into a round boule and place seam-side up in a floured banneton or towel-lined bowl.
- Cover and refrigerate for 8–12 hours.
- Preheat a Dutch oven and oven to 450°F (230°C) for 30–45 minutes.
- Turn the cold dough onto parchment and score the top.
- Bake covered for 25 minutes.
- Remove the lid, reduce the oven to 425°F (220°C), and bake for another 18–25 minutes.
- Transfer to a wire rack and cool for at least 1 hour before slicing.