 Cooking
Ingredients
- 2 cups heavy whipping cream, cold
- 1 can (approximately 395 g) sweetened condensed milk
- 2 teaspoons pure vanilla extract
- A small pinch of salt (optional)
- ½ cup chocolate chips or chopped nuts (optional)
- Fresh strawberries, chocolate sauce, or other toppings for serving (optional)
Instructions
Step 1: Prepare the Ingredients
Before you begin, make sure the heavy whipping cream is thoroughly chilled. Cold cream whips more easily and helps produce a thick, airy texture.
For even better results, place your mixing bowl and beaters in the refrigerator for about 10–15 minutes before starting. This is especially helpful in a warm kitchen.
Measure the condensed milk and vanilla extract so everything is ready to combine. If you plan to add chocolate chips, chopped nuts, or other mix-ins, prepare them in advance.
Step 2: Whip the Heavy Cream
Pour the cold heavy whipping cream into a large mixing bowl. Using an electric hand mixer or stand mixer, beat the cream at medium speed until it begins to thicken.
Continue whipping for approximately 3–5 minutes, depending on your mixer. The cream should form stiff peaks when you lift the beaters. This means the whipped cream holds its shape without immediately collapsing.
Be careful not to overwhip the cream, as excessive beating can make it grainy and eventually turn it into butter.
If you do not have an electric mixer, you can use a hand whisk, although it will take longer and require more effort.
Step 3: Mix the Condensed Milk and Vanilla
In a separate bowl, combine the sweetened condensed milk and vanilla extract. Add a small pinch of salt if desired.
Stir until the mixture is smooth and evenly combined. The condensed milk provides sweetness and helps create a creamy texture, while vanilla gives the ice cream its classic aroma and flavor.
Taste the mixture before proceeding. Since condensed milk is already sweet, you generally do not need to add extra sugar.
Step 4: Fold the Mixtures Together
Add approximately one-third of the whipped cream to the condensed milk mixture. Stir gently to lighten the mixture.
Next, add the remaining whipped cream in two portions. Use a spatula to fold the ingredients together with slow, gentle movements.
Avoid vigorous stirring because it can deflate the whipped cream and make the finished ice cream less airy.
Continue folding until the mixture has a uniform pale color and a smooth, fluffy consistency. Make sure there are no large streaks of condensed milk remaining at the bottom of the bowl.
Step 5: Add Your Favorite Flavors
The vanilla mixture is delicious on its own, but you can personalize it with additional ingredients.
For chocolate chip ice cream, gently fold in the chocolate chips. For a nutty flavor, add chopped almonds, walnuts, or pistachios. You can also swirl in a small amount of chocolate sauce, caramel, or fruit puree.
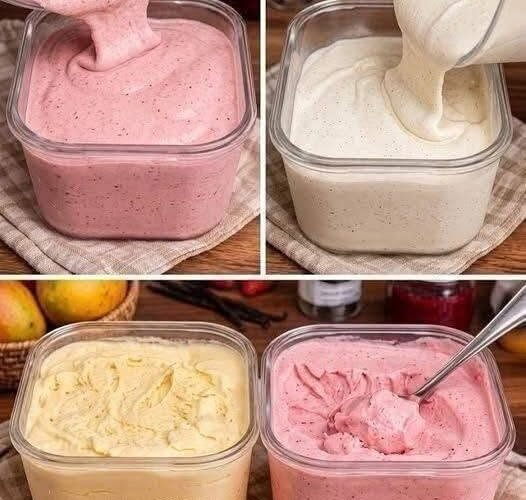
If you want strawberry ice cream, fold in a few tablespoons of thick strawberry puree. Avoid adding too much watery fruit puree, as excess moisture can create ice crystals.
For a chocolate version, mix 2–3 tablespoons of sifted cocoa powder into the condensed milk before combining it with the whipped cream.
Keep any additions moderate so the ice cream maintains its creamy texture.
Step 6: Transfer to a Container
Choose a clean, freezer-safe container with a lid. A shallow container works particularly well because the mixture freezes more evenly.
Pour the ice cream mixture into the container and smooth the surface with a spatula.
If desired, sprinkle extra chocolate chips or chopped nuts on top. For a decorative swirl, drizzle a little thick chocolate sauce over the surface and gently draw a knife through it.
Cover the container tightly with its lid. If your container does not have a secure lid, press freezer-safe wrap over the surface before covering it to help reduce exposure to air.
Step 7: Freeze Until Firm
Place the covered container in the freezer for at least 6–8 hours, or preferably overnight.
Avoid opening the freezer repeatedly during the initial freezing period because temperature changes can slow freezing and encourage ice crystals.
Unlike traditional ice cream recipes that require repeated churning, this no-churn version relies on whipped cream to incorporate air into the mixture. The result is a rich, scoopable dessert with minimal effort.
For the best texture, keep the container level in the freezer and make sure the lid remains tightly closed.
Step 8: Serve and Enjoy
Remove the ice cream from the freezer and let it stand at room temperature for approximately 3–5 minutes before scooping, depending on how firmly it has frozen.
Use a clean ice cream scoop dipped briefly in warm water to make neat, rounded scoops.
Serve in bowls, cones, or dessert glasses. Add fresh berries, sliced bananas, chocolate sauce, crushed biscuits, or chopped nuts according to your preference.
Enjoy immediately while the ice cream is creamy and cold.
Tips for Perfect Homemade Ice Cream
- Use cold cream: Well-chilled heavy cream whips more efficiently and produces a better texture.
- Choose the right cream: Use heavy whipping cream with approximately 35% fat or more for the richest results.
- Fold gently: Preserving the air in the whipped cream helps keep the ice cream light.
- Avoid excess liquid: Large amounts of juice or watery fruit puree can create ice crystals.
- Cover tightly: Proper covering helps prevent freezer odors and freezer burn.
- Allow a short softening period: A few minutes outside the freezer makes scooping easier.
- Experiment with flavors: Vanilla, chocolate, coffee, strawberry, and crushed-cookie variations are easy to prepare using the same basic method.
Storage Instructions
Store homemade ice cream in a tightly covered, freezer-safe container at approximately -18°C (0°F) or below. For the best flavor and texture, enjoy it within 2–3 weeks.
Always use a clean scoop when serving and return the container to the freezer promptly. Avoid repeatedly melting and refreezing the ice cream because this can damage its texture and increase food-safety risks.
Recipe Summary
- Preparation time: 15 minutes
- Freezing time: 6–8 hours
- Total time: Approximately 6 hours 15 minutes to 8 hours 15 minutes
- Servings: 8
- Difficulty: Easy
- Method: No-churn, no ice cream maker required
Conclusion
Simple homemade ice cream is an easy and enjoyable dessert that requires only a handful of ingredients and very little preparation. By combining whipped cream with sweetened condensed milk and vanilla, you can create a smooth, rich treat without specialized equipment or complicated cooking steps.
Whether you prefer classic vanilla, chocolate chip, strawberry, or a nutty variation, this recipe gives you plenty of opportunities to experiment. Prepare a batch ahead of time, freeze it overnight, and enjoy homemade ice cream whenever you want a refreshing dessert.