 Cooking
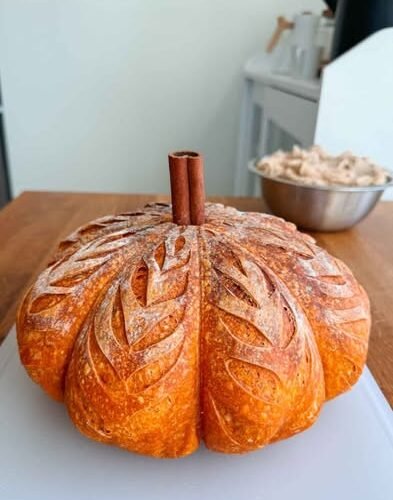
Pumpkin Shaped Sourdough Bread is a beautiful homemade loaf that combines the naturally fermented flavor of sourdough with real pumpkin puree, honey, and warm pumpkin spice. Its soft interior, golden crust, and charming pumpkin shape make it an especially fun recipe for fall baking. The loaf is shaped with food-grade baking twine, which creates the familiar pumpkin sections as the dough expands during baking, while a cinnamon stick adds the perfect finishing touch.
Why You’ll Love This Pumpkin Shaped Sourdough Bread
This recipe is more than just a beautiful centerpiece. Pumpkin puree adds moisture and a subtle seasonal flavor, while honey gives the bread a gentle sweetness. Pumpkin spice brings warm autumn notes without overpowering the naturally tangy flavor of sourdough. Bread flour provides the structure needed for a rounded artisan loaf, and optional whole wheat flour adds extra depth. The result is a versatile bread that can be served with breakfast, alongside soup, with a savory dinner, or simply toasted with butter.
The Secret Is an Active Sourdough Starter
A strong sourdough starter is the foundation of this recipe. Before mixing the dough, refresh the starter and allow it to become bubbly, active, and noticeably increased in volume. A starter that is ready for baking should be lively and strong enough to ferment the dough properly.
Because starter activity depends on temperature, flour, hydration, and the condition of the starter, it is better to watch its behavior rather than rely only on the clock. When the starter has risen well and begins to fall slightly from its peak, it is ready to use.
Choosing Pumpkin Puree
Real pumpkin puree gives this loaf its seasonal character while also contributing moisture to the dough. A thick pumpkin puree is easier to work with than a watery one because excess moisture can make sourdough dough more difficult to handle.
Be sure to use pumpkin puree rather than pumpkin pie filling. Pumpkin pie filling usually contains additional sugar and spices and is not intended for this recipe. Orange food coloring can also be added if you want a stronger pumpkin-orange appearance, but it is completely optional.
How to Make Pumpkin Sourdough Dough
Start by combining the water, active sourdough starter, honey, and optional orange food coloring in a large bowl. Whisk everything together until well distributed. Add the bread flour, optional whole wheat flour, pumpkin puree, pumpkin spice, and salt.
Mix until the ingredients form a dough and there are no obvious dry patches. The dough may look rough at first, but that is normal. Cover it and let it rest for about 30 minutes. This resting period allows the flour to hydrate and prepares the dough for strengthening.
Building Dough Strength With Stretch and Folds
Instead of traditional kneading, this recipe uses a series of stretch-and-fold movements to strengthen the dough. After the first 30-minute rest, lightly dampen your hands with water.
Take one side of the dough, gently stretch it upward, and fold it toward the center. Rotate the bowl and repeat the process with the remaining sides. Complete four rounds in total, allowing the dough to rest between each round.
As the folds progress, the dough should become smoother, stronger, and more elastic. Work gently rather than pulling aggressively, because overly forceful stretching can tear the dough.
Bulk Fermentation
After the stretch-and-fold rounds, allow the dough to continue fermenting at room temperature for approximately 6 to 8 hours. The exact timing will depend on your kitchen temperature and the strength of your sourdough starter.
Look for the dough to increase by approximately 50 percent in volume. It should also develop visible bubbles and have a soft, jiggly texture when the bowl is gently moved. These signs are more reliable than following a strict fermentation time.
Shaping the Loaf
Once bulk fermentation is complete, gently turn the dough onto a lightly floured work surface. Try not to press out all the fermentation gases because they contribute to the final crumb.
Fold the dough toward the center from several sides before turning it seam-side down. Gently pull the dough toward yourself against the work surface to create surface tension. This creates a strong, rounded dough ball that will hold its shape during the final proof and baking process.
Transfer the shaped dough into a lightly floured proofing basket with the seam facing upward.
Cold Proofing for Better Flavor
The shaped dough is refrigerated overnight or for up to 48 hours, with a minimum of 12 hours recommended. Cold fermentation slows the activity of the sourdough starter and allows the dough to develop a deeper flavor.
This overnight stage is also convenient because the work can be divided between two days. Prepare and ferment the dough one day, refrigerate it overnight, and continue with shaping and baking the next day.
Creating the Pumpkin Shape
The pumpkin appearance is what makes this sourdough loaf especially special. Before baking, soak food-grade baking twine or cotton string in oil. Olive oil or avocado oil can be used.
Arrange the prepared string around the loaf to create evenly spaced sections. Do not tie the twine too tightly because the dough needs room to expand in the oven. As the loaf rises and bakes, the spaces between the strings form the natural grooves of a pumpkin.
Taking a little extra time to position the string evenly will help create a more attractive final shape.
Adding the Cinnamon Stick Stem
After baking, place a large cinnamon stick in the center of the loaf to create the pumpkin stem. It is a simple finishing detail, but it makes the pumpkin shape immediately recognizable.
The cinnamon also complements the pumpkin spice in the bread, making the entire loaf feel perfectly suited to autumn gatherings, holiday meals, weekend brunches, and seasonal baking displays.
Baking and Cooling
Bake the prepared loaf according to your established sourdough baking setup until the crust is fully baked and nicely colored. Once baked, allow the bread to cool completely before slicing.
Cooling is an important part of sourdough baking because the interior continues to set after the loaf comes out of the oven. Cutting into the bread too early can compress the crumb and make it appear gummy.
Once cooled, the loaf can be finished with its cinnamon stick stem and served.
How to Serve Pumpkin Shaped Sourdough Bread
This pumpkin loaf works beautifully with both sweet and savory foods. Toast thick slices and serve them with butter or honey for breakfast. You can also pair the bread with eggs, roasted vegetables, soups, or hearty autumn dinners.
Because the loaf has such a decorative appearance, it can also be served whole on a bread board and sliced at the table. Its warm pumpkin flavor and attractive shape make it an excellent addition to a fall bread basket.
How to Store Pumpkin Sourdough
Allow the loaf to cool completely before storing it. Once cool, keep it in a suitable bread bag or wrap it properly to protect it from excessive exposure to air.
If you plan to eat the bread within a few days, room-temperature storage is generally preferable to refrigeration because refrigeration can cause bread to lose its pleasant texture more quickly.
For longer storage, slice the bread and freeze individual portions. The slices can then be thawed and toasted whenever you want fresh-tasting homemade sourdough.
Common Fermentation Problems
Sourdough baking becomes easier once you learn to read the dough. If the dough remains dense and shows very little activity, your starter may not have been active enough or the room may be too cool.
If the dough becomes extremely loose and difficult to shape, it may have fermented too far or may not have developed enough strength. Always consider the temperature of your kitchen and the activity of your starter when judging fermentation.
The goal is not to follow the clock perfectly. Instead, look for increased volume, bubbles, elasticity, and a noticeable jiggle.
Tips for the Best Pumpkin Sourdough
Use a strong and active sourdough starter for the best rise. Keep your hands lightly damp during stretch-and-fold sessions to prevent excessive sticking.
Whole wheat flour is optional and can be replaced with bread flour. Orange food coloring is also optional and is only needed if you want a more intense pumpkin-orange color.
When creating the pumpkin sections, always use food-grade cotton string or baking twine and soak it in oil first. Position the strings evenly and avoid tying them too tightly.
Most importantly, give the dough enough time to ferment. Sourdough cannot always be rushed, and patience is one of the most important ingredients in a successful loaf.
Frequently Asked Questions
Does Pumpkin Sourdough Taste Strongly Like Pumpkin?
The loaf has a noticeable pumpkin character, but the flavor is balanced by sourdough fermentation, honey, and pumpkin spice. It tastes like a seasonal artisan bread rather than a sweet pumpkin cake.
Can I Skip the Whole Wheat Flour?
Yes. The whole wheat flour is optional in this recipe and can be replaced with bread flour.
Do I Need Orange Food Coloring?
No. Orange food coloring is completely optional. It can intensify the pumpkin-like appearance, but the loaf can be made successfully without it.
How Long Can I Cold Proof the Dough?
The recipe recommends at least 12 hours of cold fermentation and allows the dough to remain refrigerated for up to 48 hours.
Why Is My Fermentation Taking Longer?
Sourdough fermentation depends heavily on starter strength and temperature. A cool kitchen can significantly slow the process, so watch the dough for signs of fermentation rather than relying only on the estimated time.
Final Thoughts
Pumpkin Shaped Sourdough Bread is a wonderful way to combine the rustic character of naturally fermented bread with the fun presentation of seasonal baking. Pumpkin puree, honey, and pumpkin spice create a warm flavor profile, while the overnight fermentation develops the distinctive character of sourdough.
The decorative pumpkin shape may look complicated, but it is created with a simple technique using food-grade baking twine. Once the dough has been properly fermented and shaped, the string does most of the decorative work as the loaf expands during baking.
Whether you make this bread for a fall dinner, holiday gathering, weekend brunch, or simply because you want to try something different with your sourdough starter, this loaf is sure to bring a seasonal touch to the table.
Recipe Card
Pumpkin Shaped Sourdough Bread
Description:
A beautiful fall-inspired sourdough loaf made with pumpkin puree, honey, pumpkin spice, and an active sourdough starter. The dough is slowly fermented, shaped with food-grade baking twine, and finished with a cinnamon stick stem.
Prep Time: 1 hour
Cook Time: 40 minutes
Chill/Fermentation Time: 18 hours
Total Time: 19 hours 40 minutes
Servings: 1 loaf
Course: Sourdough Bread
Keyword: Pumpkin Shaped Sourdough Bread
Ingredients
Sourdough Starter
- 20 g (1 tablespoon) sourdough starter
- 80 g (⅔ cup) flour
- 80 g (⅓ cup) water
Pumpkin Sourdough Bread
- 475 g (3¾ cups) bread flour
- 25 g (3 tablespoons) whole wheat flour, optional
- 100 g (⅓ cup) pumpkin puree
- 100 g (⅓ cup) sourdough starter
- 325 g (1⅓ cups + 1) water
- 10 g (1¾ teaspoons) salt
- 20 g (1 tablespoon and 1 teaspoon) honey
- 1 teaspoon pumpkin spice
Additional Ingredients
- Optional orange food coloring
- Baking twine or food-grade cotton string
- Oil for soaking the baking twine
- 1 large cinnamon stick
Instructions
1. Feed the Sourdough Starter
About 8–12 hours before making the dough, refresh the starter with 80 g flour and 80 g water. Let it ferment until bubbly, doubled in size, and beginning to fall from its peak.
2. Mix the Wet Ingredients
Add the water, active sourdough starter, honey, and optional orange food coloring to a large bowl. Whisk until combined.
3. Add the Remaining Ingredients
Add the bread flour, optional whole wheat flour, pumpkin puree, pumpkin spice, and salt. Mix until a dough forms and no dry flour remains.
4. Rest
Cover the dough and let it rest at room temperature for approximately 30 minutes.
5. Stretch and Fold
Dampen your hands. Stretch one side of the dough upward and fold it toward the center. Rotate the bowl and repeat with all four sides.
6. Repeat
Allow the dough to rest, then repeat the stretch-and-fold process every 60 minutes until four rounds have been completed.
7. Bulk Ferment
Cover and allow the dough to rise for approximately 6–8 hours. Look for roughly a 50% increase in size, visible bubbles, and a jiggly texture.
8. Shape
Turn the dough onto a lightly floured surface. Fold the dough toward the center from several sides, then turn it seam-side down. Gently pull the dough toward yourself to create surface tension and form a tight round loaf.
9. Proof
Transfer the dough into a lightly floured proofing basket with the seam facing upward.
10. Cold Proof
Cover and refrigerate overnight or for up to 48 hours. At least 12 hours is recommended.
11. Create the Pumpkin Shape
Soak food-grade baking twine in oil. Arrange the twine around the loaf to create evenly spaced pumpkin sections. Do not tie it too tightly.
12. Bake
Bake according to your established sourdough baking setup until fully baked with a well-colored crust. Allow the bread to cool completely before slicing.
13. Add the Stem
Place the large cinnamon stick in the center of the cooled loaf to create the pumpkin stem.
Recipe Notes
- Use an active, bubbly sourdough starter.
- Whole wheat flour is optional and can be replaced with bread flour.
- Orange food coloring is optional.
- Fermentation time varies depending on starter strength and room temperature.
- Look for approximately a 50% increase in dough volume during bulk fermentation.
- Use food-grade cotton string or baking twine.
- Soak the twine in oil before using it.
- Cold-proof the dough for at least 12 hours for deeper flavor.
- The dough can remain refrigerated for up to 48 hours.
- Cool the loaf completely before slicing.
Nutrition
Nutritional information was not provided with the original recipe, so exact nutrition values cannot be calculated reliably without the specific ingredient brands and measurements.