Category: Recipes

  • Air Fryer Chicken Legs Recipe:

    Air Fryer Chicken Legs Recipe:

    Air Fryer Chicken Legs Recipe: A Complete Guide to Crispy, Juicy Perfection

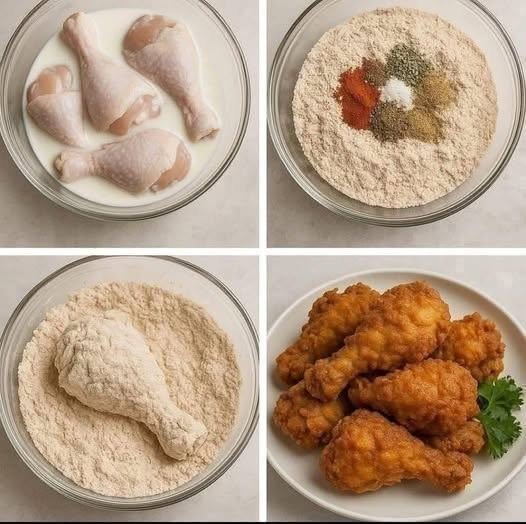
    Air fryer chicken legs are one of the easiest and most delicious meals you can prepare at home. They are crispy on the outside, tender and juicy on the inside, and require very little oil compared to traditional frying. Whether you’re cooking for a family dinner, meal prepping for the week, or simply craving flavorful chicken, this recipe delivers restaurant-quality results with minimal effort.

    The air fryer works by circulating hot air around the food, creating a crispy exterior while locking in moisture. Chicken drumsticks are particularly well suited for air frying because their higher fat content helps keep the meat juicy throughout the cooking process.

    This comprehensive recipe will guide you through everything you need to know, from selecting the best chicken to seasoning, cooking, serving suggestions, storage, and helpful tips for perfect results every time.


    Why You’ll Love This Recipe

    There are many reasons why air fryer chicken legs have become a favorite among home cooks.

    • Ready in about 30โ€“35 minutes
    • Crispy skin without deep frying
    • Juicy and flavorful meat
    • Budget-friendly meal
    • Easy cleanup
    • Perfect for weeknight dinners
    • Great for meal prep
    • Family-friendly
    • Uses simple pantry ingredients

    Ingredients

    For 6 chicken drumsticks:

    • 6 chicken legs (drumsticks)
    • 2 tablespoons olive oil
    • 1 teaspoon garlic powder
    • 1 teaspoon onion powder
    • 1 teaspoon smoked paprika
    • 1 teaspoon sweet paprika
    • 1 teaspoon Italian seasoning
    • ยฝ teaspoon black pepper
    • 1ยฝ teaspoons salt
    • ยฝ teaspoon cayenne pepper (optional)
    • 1 teaspoon brown sugar (optional for extra caramelization)

    Optional Garnishes:

    • Fresh chopped parsley
    • Lemon wedges
    • Fresh cracked black pepper

    Kitchen Equipment

    You’ll need:

    • Air fryer
    • Mixing bowl
    • Paper towels
    • Measuring spoons
    • Tongs
    • Meat thermometer

    Step 1: Prepare the Chicken

    Remove the chicken legs from the refrigerator about 20 minutes before cooking. Allowing the chicken to come closer to room temperature helps it cook more evenly.

    Pat each drumstick completely dry using paper towels. This step is extremely important because dry skin becomes crispier during cooking.

    Trim away any excess skin if desired.


    Step 2: Make the Seasoning

    In a small bowl, combine:

    • Garlic powder
    • Onion powder
    • Smoked paprika
    • Sweet paprika
    • Italian seasoning
    • Salt
    • Black pepper
    • Cayenne pepper
    • Brown sugar

    Mix thoroughly until evenly combined.


    Step 3: Season the Chicken

    Place the drumsticks into a large mixing bowl.

    Drizzle olive oil over the chicken.

    Sprinkle the seasoning mixture evenly across all the drumsticks.

    Use your hands or tongs to massage the seasoning into every part of the chicken, ensuring each drumstick is fully coated.

    Let the chicken rest for about 10โ€“15 minutes.


    Step 4: Preheat the Air Fryer

    Preheat the air fryer to 380ยฐF (193ยฐC) for about 3โ€“5 minutes.

    Although some air fryers don’t require preheating, doing so helps achieve crispier skin.


    Step 5: Arrange the Chicken

    Place the drumsticks in a single layer inside the air fryer basket.

    Do not stack or overcrowd them.

    Leave space between each piece so hot air can circulate properly.

    If needed, cook in batches.


    Step 6: Cook

    Cook at 380ยฐF (193ยฐC) for 10 minutes.

    Open the basket.

    Turn each chicken leg using tongs.

    Continue cooking another 10 minutes.

    Increase the temperature to 400ยฐF (204ยฐC).

    Cook another 5โ€“8 minutes until crispy.

    The internal temperature should reach 165ยฐF (74ยฐC) in the thickest part without touching the bone.

    For even juicier chicken, many cooks prefer cooking until 175โ€“185ยฐF (79โ€“85ยฐC), as drumsticks become more tender at these temperatures.


    Step 7: Rest Before Serving

    Transfer the chicken to a serving plate.

    Allow it to rest for 5 minutes.

    Resting lets the juices redistribute throughout the meat, making every bite more flavorful.


    Flavor Variations

    BBQ Chicken Legs

    Brush your favorite barbecue sauce onto the chicken during the final 5 minutes of cooking.

    Buffalo Style

    Toss cooked drumsticks in buffalo sauce and serve with ranch or blue cheese dressing.

    Lemon Herb

    Add lemon zest, rosemary, thyme, and parsley for a bright, fresh flavor.

    Cajun

    Replace Italian seasoning with Cajun seasoning for a spicy Southern-style meal.

    Honey Garlic

    Mix honey, garlic, soy sauce, and butter into a glaze. Brush it over the chicken during the final few minutes of cooking.


    Best Side Dishes

    Air fryer chicken legs pair well with:

    • Mashed potatoes
    • Roasted vegetables
    • Coleslaw
    • Corn on the cob
    • Macaroni and cheese
    • Rice pilaf
    • Garden salad
    • Sweet potato fries
    • Garlic bread
    • Steamed broccoli

    Tips for Perfect Chicken Legs

    Always pat the chicken dry before seasoning.

    Avoid overcrowding the basket.

    Turn the chicken halfway through cooking.

    Use a meat thermometer instead of relying only on cooking time.

    Let the chicken rest before serving.

    Cook similar-sized drumsticks together for even cooking.


    Storage Instructions

    Allow leftovers to cool completely.

    Store in an airtight container in the refrigerator for up to 4 days.

    For longer storage, freeze for up to 3 months.

    Wrap each drumstick individually before freezing to prevent freezer burn.


    Reheating

    For the best texture, reheat in the air fryer at 375ยฐF (190ยฐC) for 4โ€“6 minutes, or until heated through.

    You can also reheat in the oven at 375ยฐF (190ยฐC) for about 10โ€“15 minutes. Microwaving works in a pinch but may soften the skin.


    Nutrition (Approximate Per Serving)

    Based on one seasoned drumstick:

    • Calories: 220
    • Protein: 22 g
    • Fat: 14 g
    • Carbohydrates: 2 g
    • Fiber: 0 g
    • Sugar: 1 g
    • Sodium: 450 mg

    Values may vary depending on the size of the chicken and the specific ingredients used.


    Frequently Asked Questions

    Can I cook frozen chicken legs in the air fryer?
    Yes. Increase the cooking time by about 10โ€“15 minutes, then season once the surface has thawed enough for the spices to stick. Always verify the internal temperature reaches at least 165ยฐF (74ยฐC).

    Do I need to use oil?
    A small amount of oil helps the seasonings adhere and encourages browning, but you can reduce or omit it if desired.

    Can I marinate the chicken first?
    Absolutely. Marinating for 2โ€“24 hours adds even more flavor. Pat the chicken lightly before air frying to prevent excess moisture from reducing crispiness.

    Why isn’t my chicken crispy?
    Common reasons include overcrowding the basket, not drying the chicken before seasoning, or cooking at too low a temperature for the final crisping stage.


    Final Thoughts

    Air fryer chicken legs are a simple, affordable, and satisfying meal that consistently delivers crispy skin and juicy meat with very little effort. With a handful of pantry spices and about half an hour of cooking time, you can create a flavorful dish that works for busy weeknights, casual gatherings, or meal prep. Once you’ve mastered the basic recipe, experiment with different spice blends and sauces to keep this versatile favorite fresh and exciting. Enjoy your homemade air fryer chicken legs with your favorite sides for a meal that’s both comforting and delicious.
  • Gluten-Free Keto Sourdough Bread

    Gluten-Free Keto Sourdough Bread

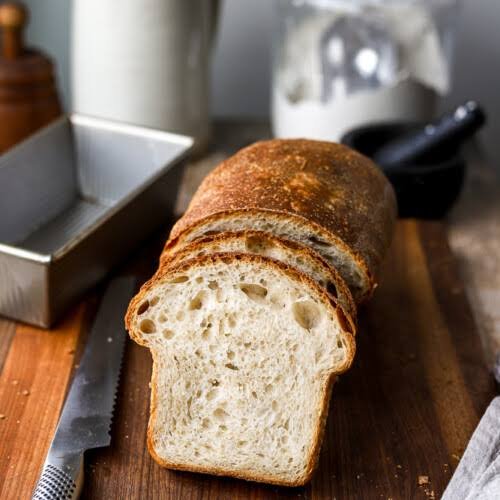
    Bread has long been a central component of human diets, symbolizing comfort, nourishment, and tradition. However, modern dietary needs have significantly altered how bread is made and consumed. For individuals following gluten-free or ketogenic lifestyles, traditional bread is no longer an option due to its high carbohydrate content and reliance on wheat-based gluten. In response, innovative recipes have emerged that preserve the essence of bread while aligning with contemporary health requirements. One of the most remarkable of these innovations is the gluten-free keto sourdough bread recipe.

    This recipe combines three powerful dietary conceptsโ€”gluten-free baking, ketogenic nutrition, and sourdough fermentationโ€”into a single loaf that is nutritious, flavorful, and functional. This essay presents a comprehensive discussion of the recipe, including ingredient selection, starter preparation, step-by-step baking method, scientific principles, challenges, and nutritional benefits.

    Understanding the Purpose of the Recipe

    A gluten-free keto sourdough bread recipe is designed to achieve several goals simultaneously. First, it must exclude gluten-containing grains such as wheat, barley, and rye. Second, it must remain low in net carbohydrates to support ketosis. Third, it must utilize natural fermentation to develop flavor, texture, and digestibility.

    Achieving all three goals in a single recipe is challenging. Gluten provides elasticity, carbohydrates fuel yeast fermentation, and keto-friendly ingredients behave very differently from traditional flour. Therefore, every component of this recipe is carefully chosen to mimic the structure and taste of conventional sourdough bread while maintaining dietary compliance.

    Ingredients and Their Functional Roles

    The success of gluten-free keto sourdough bread depends largely on ingredient selection. Each ingredient serves a specific structural, nutritional, or flavor-related purpose.

    Almond Flour

    Almond flour is the primary base of the recipe. It is low in carbohydrates and high in healthy fats, protein, and micronutrients such as vitamin E and magnesium. Its fine texture allows it to blend smoothly into dough, providing a mild, nutty flavor that complements sourdough fermentation.

    Coconut Flour

    Coconut flour is added in small amounts due to its high absorbency. It enhances fiber content and helps balance moisture in the dough. Using too much coconut flour can result in dryness, so precision is essential.

    Psyllium Husk Powder

    Psyllium husk is the most critical ingredient in gluten-free bread recipes. It mimics the elasticity and binding properties of gluten by forming a gel when mixed with liquid. This gel traps gases produced during fermentation, allowing the bread to rise and maintain structure.

    Ground Flaxseed or Chia Seeds

    These seeds act as natural binders and contribute omega-3 fatty acids. They also improve crumb texture and add nutritional value.

    Eggs

    Eggs provide structure, moisture, and protein. They also help emulsify fats and improve the overall stability of the loaf.

    Healthy Fats

    Olive oil, coconut oil, or butter is used to enhance flavor and keep the bread moist. These fats align with ketogenic dietary requirements and improve mouthfeel.

    Gluten-Free Keto Sourdough Starter

    The sourdough starter is the heart of the recipe. Unlike traditional starters, it is made using low-carb, gluten-free ingredients. While fermentation is slower due to limited sugars, it still produces the characteristic tangy flavor of sourdough bread.

    Salt

    Salt enhances flavor, regulates fermentation, and strengthens the dough structure.

    Warm Water

    Water activates psyllium husk, hydrates flours, and supports fermentation.

    Preparing the Gluten-Free Keto Sourdough Starter

    Before baking the bread, a sourdough starter must be prepared. This process may take several days but is essential for authentic sourdough flavor.

    To create the starter, almond flour or flaxseed meal is mixed with water and allowed to ferment at room temperature. The mixture is fed daily with fresh flour and water. Over time, natural wild yeast and beneficial bacteria develop, producing bubbles and a mildly sour aroma.

    Although keto flours contain fewer fermentable sugars, patience allows microbial activity to stabilize. Once the starter is active and bubbly, it is ready to be used in the bread recipe.

    Step-by-Step Recipe Method

    Step 1: Mixing the Dry Ingredients

    In a large mixing bowl, almond flour, coconut flour, psyllium husk powder, ground flaxseed, and salt are thoroughly combined. Proper mixing ensures even distribution and prevents clumping.

    Step 2: Activating the Psyllium Gel

    Warm water is added slowly to the dry mixture while stirring continuously. Psyllium husk absorbs liquid rapidly, forming a thick gel that resembles traditional bread dough.

    Step 3: Incorporating Wet Ingredients

    Eggs, healthy fats, and the sourdough starter are added to the mixture. The dough is mixed until smooth and cohesive. At this stage, the dough will feel dense and sticky rather than elastic.

    Step 4: Fermentation

    The dough is shaped into a loaf and placed in a greased or parchment-lined pan. It is then covered and left to ferment at room temperature for several hours or overnight. During this time, the starter produces gases and organic acids, enhancing flavor and texture.

    Step 5: Baking

    The oven is preheated to a moderate temperature. Steam may be introduced during the initial baking phase to improve crust development. The bread is baked until the crust is firm and the internal structure is set.

    Step 6: Cooling

    After baking, the bread must cool completely before slicing. This step is crucial, as gluten-free breads continue to firm up as they cool.

    Scientific Principles Behind the Recipe

    Gluten-free keto sourdough bread relies on alternative scientific mechanisms to replicate traditional bread structure.

    • Gel Formation: Psyllium husk forms a network that traps gas bubbles.
    • Protein Coagulation: Eggs provide stability during baking.
    • Fermentation Acids: Lactic acid bacteria improve flavor and mineral absorption.
    • Fat Integration: Healthy fats enhance softness and shelf life.

    These mechanisms work together to compensate for the absence of gluten and starch.

    Nutritional Profile of the Bread

    This recipe offers numerous health benefits.

    • Low Net Carbs: Suitable for ketogenic diets.
    • High Fiber: Supports digestive health.
    • Healthy Fats: Promote sustained energy.
    • Blood Sugar Control: Low glycemic impact.
    • Improved Digestibility: Fermentation breaks down complex compounds.

    Compared to commercial gluten-free breads, which often contain refined starches, this recipe provides superior nutritional value.

    Common Challenges and Solutions

    Dense Texture

    This can result from insufficient fermentation or excess psyllium husk. Adjusting hydration levels can help.

    Gumminess

    Overuse of psyllium or underbaking may cause gumminess. Accurate measurements and proper baking time are essential.

    Weak Rise

    Gluten-free dough will not rise dramatically. Allowing longer fermentation improves volume and crumb structure.

    Storage and Serving Suggestions

    The bread should be stored in an airtight container in the refrigerator for extended freshness. It can also be sliced and frozen for convenience.

    Gluten-free keto sourdough bread pairs well with butter, avocado, eggs, cheese, or sugar-free spreads. It is suitable for sandwiches, toast, or as a side with soups and salads.

    Cultural and Lifestyle Importance

    This recipe represents a shift toward inclusive and mindful cooking. It allows individuals with dietary restrictions to enjoy a traditional food without compromise. It also reflects a renewed appreciation for fermentation and homemade foods in modern lifestyles.

    Conclusion

    The gluten-free keto sourdough bread recipe is a testament to culinary innovation and nutritional awareness. By thoughtfully combining alternative flours, natural fermentation, and ketogenic principles, this recipe creates a loaf that is both nourishing and satisfying. Though it requires patience and precision, the result is a wholesome bread that supports health without sacrificing flavor or tradition.

    In an era where dietary needs are increasingly diverse, gluten-free keto sourdough bread stands as an example of how food can evolve while honoring its roots.

  • Best Sourdough Discard Scones

    Best Sourdough Discard Scones

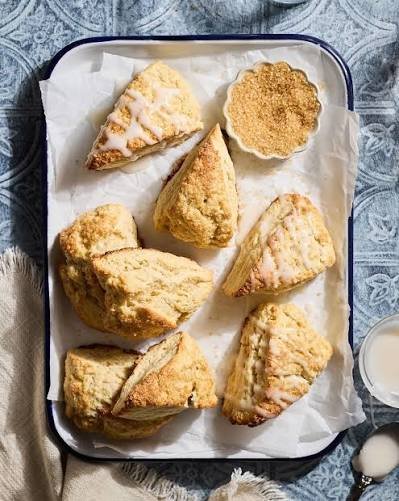
    Flaky, tender, slightly tangy scones that are perfect for breakfast, brunch, or tea time. Great way to use extra sourdough discard!

    These Sourdough Discard Scones are tender, buttery, and perfectly flaky with a subtle tang that makes them irresistibly delicious. Made with simple pantry ingredients and leftover sourdough discard, this easy recipe transforms kitchen scraps into bakery-quality scones in under an hour.

    Golden and lightly crisp on the outside with a soft, delicate crumb inside, these scones are not overly sweet โ€” making them perfect for pairing with jam, clotted cream, honey butter, or a simple glaze. Whether you prefer classic vanilla, juicy blueberries, chocolate chips, or a savory twist, this versatile base recipe can be customized to suit any craving.

    Ideal for breakfast, brunch, afternoon tea, or meal prep, these homemade sourdough scones come together quickly and can be made ahead or frozen for later. If you’re looking for a reliable, foolproof way to use sourdough discard, this recipe delivers consistent, flaky results every time.

    โฑ Time Required

    • Prep Time: 15 minutes
    • Chill Time: 20โ€“30 minutes (recommended for flakier scones)
    • Bake Time: 18โ€“22 minutes
    • Total Time: About 1 hour

    ๐Ÿง‚ Ingredients (Makes 8 large scones)

    Dry Ingredients

    • 2 cups (240g) all-purpose flour
    • 1/3 cup (65g) granulated sugar
    • 1 tablespoon baking powder
    • 1/2 teaspoon baking soda
    • 1/2 teaspoon salt

    Wet Ingredients

    • 1/2 cup (113g) cold unsalted butter, cubed
    • 1/2 cup (120g) sourdough discard (unfed, cold)
    • 1/3 cup (80ml) heavy cream (plus extra for brushing)
    • 1 large egg
    • 1 teaspoon vanilla extract

    Optional Add-ins (choose one or combine)

    • 1/2 cup chocolate chips
    • 1/2 cup fresh or frozen blueberries
    • 1/2 cup chopped dried cranberries
    • 1 teaspoon lemon zest (great with blueberries)

    ๐Ÿ‘ฉโ€๐Ÿณ Instructions

    1๏ธโƒฃ Preheat & Prep

    Preheat oven to 400ยฐF (200ยฐC).
    Line a baking sheet with parchment paper.

    2๏ธโƒฃ Mix Dry Ingredients

    In a large bowl, whisk together:

    • Flour
    • Sugar
    • Baking powder
    • Baking soda
    • Salt

    3๏ธโƒฃ Cut in the Butter

    Add cold cubed butter.
    Use a pastry cutter or your fingers to work it into the flour until the mixture resembles coarse crumbs with pea-sized butter pieces.

    ๐Ÿ‘‰ Cold butter = flaky layers.

    4๏ธโƒฃ Combine Wet Ingredients

    In a separate bowl, whisk together:

    • Sourdough discard
    • Heavy cream
    • Egg
    • Vanilla extract

    5๏ธโƒฃ Form the Dough

    Pour wet ingredients into dry ingredients.
    Gently mix until just combined. Do not overmix.

    If using add-ins, fold them in now.

    The dough will be slightly sticky but should hold together.

    6๏ธโƒฃ Shape

    Turn dough onto a lightly floured surface.
    Pat into a 1-inch thick circle (about 8 inches wide).

    Cut into 8 wedges (like pizza slices).

    7๏ธโƒฃ Chill (Highly Recommended)

    Place wedges on baking sheet and chill for 20โ€“30 minutes.
    This helps prevent spreading and improves texture.

    8๏ธโƒฃ Bake

    Brush tops with heavy cream.
    Sprinkle with coarse sugar if desired.

    Bake for 18โ€“22 minutes until golden brown.

    9๏ธโƒฃ Cool

    Let cool on pan for 5 minutes, then transfer to wire rack.

    ๐Ÿง Texture & Flavor Notes

    • Lightly crisp exterior
    • Soft, flaky inside
    • Slight tang from sourdough discard
    • Not overly sweet (great with jam or glaze)

    ๐Ÿ‹ Optional Simple Glaze

    Mix:

    • 1 cup powdered sugar
    • 1โ€“2 tablespoons milk or lemon juice
    • 1/2 teaspoon vanilla

    Drizzle over cooled scones.

    ๐Ÿ”ฅ Pro Tips for Perfect Scones

    โœ” Use cold butter and cold discard
    โœ” Donโ€™t overwork the dough
    โœ” Chill before baking
    โœ” Weigh flour if possible (most accurate)
    โœ” For extra flaky layers: fold dough over itself 2โ€“3 times before shaping

    ๐ŸงŠ Storage

    • Room Temp: 2 days (airtight container)
    • Fridge: 5 days
    • Freezer: Up to 3 months (freeze before or after baking)

    Reheat at 300ยฐF (150ยฐC) for 8โ€“10 minutes.

    โ“ Frequently Asked Questions (FAQs)

    1๏ธโƒฃ Can I use active sourdough starter instead of discard?

    Yes. Active starter works perfectly. The flavor will be slightly milder and the rise may be a bit stronger, but the texture remains similar.

    2๏ธโƒฃ Does the discard need to be fresh?

    For best flavor, use discard that is less than 1 week old and stored in the refrigerator. Very old discard can taste overly sour.

    3๏ธโƒฃ Why are my scones spreading too much?

    Common reasons:

    • Butter wasnโ€™t cold enough
    • Dough was overmixed
    • Skipped chilling step
    • Too much liquid added

    Chilling the shaped scones for 20โ€“30 minutes helps prevent spreading.

    4๏ธโƒฃ Can I make them ahead of time?

    Yes! You can:

    • Refrigerate shaped, unbaked scones overnight
    • Freeze unbaked scones for up to 3 months
      Bake directly from frozen (add 2โ€“4 extra minutes).

    5๏ธโƒฃ Can I make them without heavy cream?

    You can substitute:

    • Whole milk (texture slightly less rich)
    • Half-and-half
    • Plain Greek yogurt (reduce slightly if dough feels too wet)

    6๏ธโƒฃ How do I make them extra flaky?

    • Keep ingredients very cold
    • Leave visible butter pieces in the dough
    • Fold dough 2โ€“3 times before shaping (lamination method)

    7๏ธโƒฃ Can I reduce the sugar?

    Yes. You can reduce sugar to 1/4 cup without affecting texture. For savory scones, reduce to 1โ€“2 tablespoons.

    8๏ธโƒฃ Why are my scones dense?

    Likely causes:

    • Overmixing
    • Too much flour
    • Old baking powder
    • Dough pressed too firmly

    Measure flour carefully (preferably by weight).

    Estimated Nutrition Information

    Based on 1 plain scone (recipe makes 8), without glaze or mix-ins.

    NutrientPer Serving
    Calories~310 kcal
    Carbohydrates34g
    Protein6g
    Fat17g
    Saturated Fat10g
    Sugar9g
    Fiber1g
    Cholesterol70mg
    Sodium260mg

    ๐Ÿซ With Chocolate Chips (ยฝ cup added total)

    • +40โ€“50 calories per scone
    • +4โ€“5g sugar

    ๐Ÿ“ With Blueberries

    • Minimal calorie change
    • Slight increase in fiber